Thursday, August 1

Cupcakes and Sewing Patterns

My boyfriend, Matt, has this adorable niece named Emory. She is almost 2 years old and becoming quite the little person!

Since I am too intimidated to sew something for myself to wear, I decided to start small and try to make a dress for Emory. I have never sewn from a pattern before so this was totally new territory for me.... how exciting!

I went to Hobby Lobby and looked through all the patterns they had. I decided on this one, McCall's M5835. (WOW, much cheaper on their website than in the store.)

Then I had the difficult task of choosing fabric! I decided to go with Melissa's (Emory's mom) love for cupcakes and chose a pink fabric with cupcakes all over it. For the contrasting fabric I chose a yellow with tiny white polka-dots that matched some of the cupcake bottoms. Then, I found those super cute cupcake buttons I showed you in my Hair bow how-to post, which I was thrilled about.


I completed the dress in two sittings over two days and it was really exciting to see it taking shape! I must admit I had a difficult time figuring out what the pattern instructions were talking about specifically. I did a lot of pinning and unpinning, thinking I understood the instructions and then realizing I'd been reading it wrong. Thankfully I never made any mistakes that were permanent, but really I bought a lot of fabric in anticipation of mistakes so I was OK.

So, without further ado, here is the cupcake dress!


Emory and Melissa came over to try it on this morning and I was so surprised how well it fit! I was really worried it would be all wrong but it was so right! I would have like to have gotten some pictures but Emory was not in a picture mood so we will have to get those some other time. Hopefully I will update in a couple weeks with pictures of her in the dress.

If you are thinking about giving patterns a try and have a special little girl to dress, I recommend this pattern. There are still a couple other looks that use the same pattern that I plan on making in the future (as long as Emory doesn't grow to fast, this pattern only goes up one more size!)

Also I am very excited because I just got in the mail about 7 yards of jersey fabric. I really am going to try to sew something for myself to wear, I figure jersey is most forgiving sizing wise, and skirts are probably the easiest place to start. If it all fails I will make infinity scarves for everyone in my office  for Christmas. :)

Also I got some new fabric for tissue pouches tonight:


I love the colors!

Thanks for reading! Back soon with another post! 


Follow me on Etsy! The Makery

Sunday, July 28

Christmas in July


Recently I took a sewing class at my local quilt store down the street in Concord, NC, We're Sew Creative. They really are sew creative and I had a lot of fun learning some basics I should have learned when I got my machine 3 years ago.

At the end of the class we did a little project to put to use our new found knowledge of our sewing machines. It was a very simple and functional pocket tissue pouch. Sew 2 rectangles together, turn them out, sew up the ends, and turn them out again. OK, maybe that's a little over simplified but they really are easy and fun to make.

When I got home I made quite a few of these because I knew so many people I thought would enjoy them, a birthday, and a thank you gift. Plus I kept thinking, "OH! These fabrics will look even more cute together than the last two!"

Anyway I ending up sending one of these to my grandmother (Mother's Mother) and received a phone call today expressing how much she loved it! Not only did she love it but she thought it would be the perfect Christmas gift for her 7 friends that she eats dinner with every night. I'm flattered that she thinks so and, of course, happy to make them for her.

If you know anything about me, I'm always trying to think of more complicated ways to do easy things and that is what brings me to this blog post.

My Grandmother (Dad's Mother) gifted me a nice stash of fabric that I have been finding use for all sorts of things! Part of this stash includes these strips of fabric (presumably for quilt binding) in all sorts of cute prints and colors. All I can think about when I see these strips is how hard she must have worked to cut them all so I feel that I must use them!


Sewing Strips Together 

  •  Always sew right sides together.
  • Line up raw edges as you go, check often.
  • Press the seam after adding each strip. (I press the back and then the front as well for each strip)
This is really very easy to do, it just takes patience.  Especially if your bobbin thread gets all tangled up when you are trying to connect your first two strips of the project. Your machine may try to sabotage your project but you must press on! :p
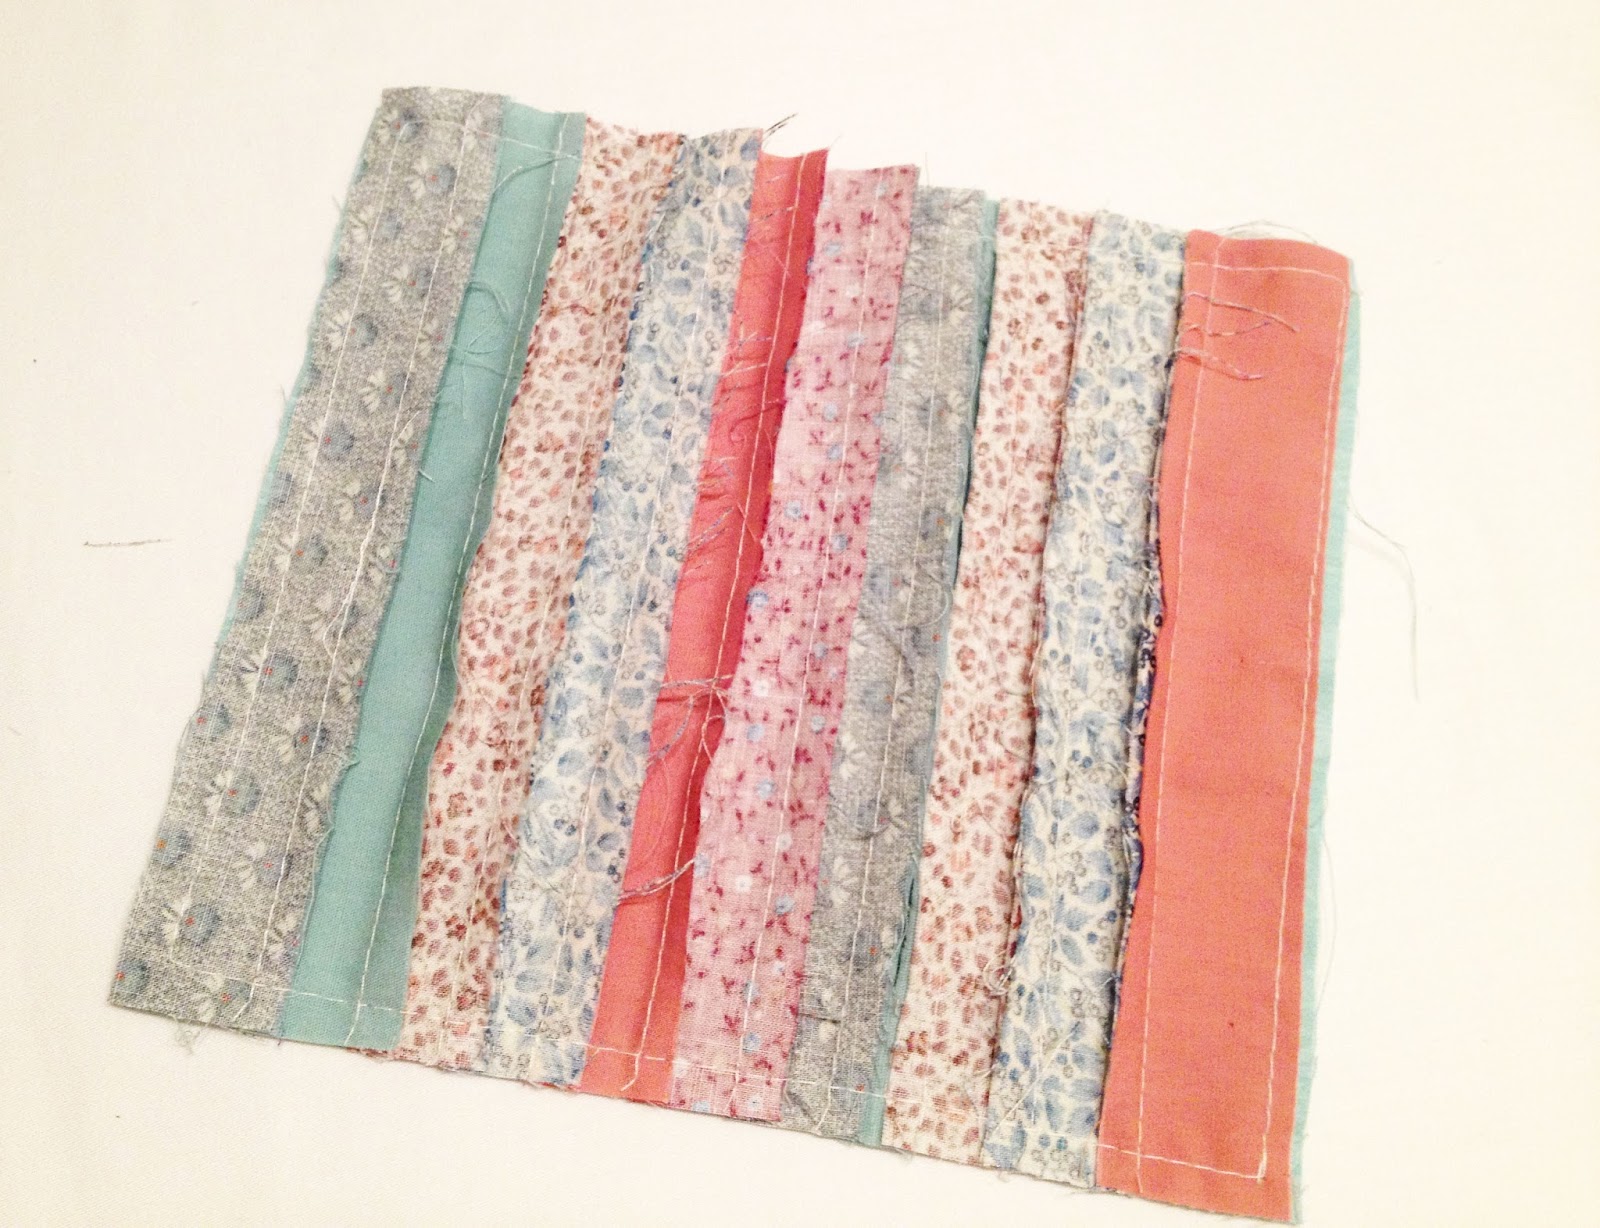
    Eventually I ended up with this below! I added strips until my width was 7.5" (actually a little more.)


    And here is a close up of the pretty patterns!


    Cutting Rectangles

    Next I laid the sewn together strips out on the cutting mat to do some measuring. Lucky me! My strips all put together measured 22" long and I needed 21". After I got over the awe of my good craft fortune, I cut my long rectangle into three 7x7.5" rectangles. You use one rectangle per pouch, the other 2 rectangles are for future pouches.


    Next I chose and cut the fabric that would be my inside liner.

    Sewing the Pouch
    Then I sewed them, right sides together, leaving about a 3 inch hole so that I could turn them out. The hardest part about this was making sure all my little seam folds would lay flat once they were sewn, you just need to pay extra special attention to this so that it won't be lumpy when you are through.


    Then I turned it right side out and pressed all the seams.

    Next you do a little special fold and sew up the two short ends. The end result, once you turn it out one more time, is a pocket tissue pouch! I think the strips turned out very cute. Now just 6 more to make. :)

    And there you have it! I think these make super cute gifts and they are quick and easy to make up. I hope you make some and find someone special to give them to!

    -Michelle

    UPDATE===============================================

    Hello again,

    Just wanted to update on this project now that I am all done!  I made a total of 4 more after the three in the pattern I posted about earler. Two I did only red/pink strips and the other two I did only blue/teal strips. They came out so cute! (I have the ends of both and I'm thinking about stitching those together and seeing what happens...)

    I also zig-zag stitched some brown paper bags together and printed up some labels with my information on them. :)

    Here is the final product! (One of each color combination)


    Follow me on Etsy: The Makery

    Thanks for reading!

    -Michelle

    Friday, July 26

    It's a Circle Within a Square!

    I was very nervous about slippery, stretchy fabric when I got a whole free yard of fabric in the mail the other day. It came with some Jersey Knit fabric I ordered and it seemed like the perfect way to practice in this unexplored territory. I was also encouraged by a great article from Pretty Prudent and had the perfect tutorial in mind, here it is!

    Little Girl's Square Cut Circle Skirt

    I found a super cute tutorial for a little girls skirt. It reminds me of Tinkerbell and what little girl doesn't like Tinkerbell? I had a skirt similar to this in high school that was black and white stripes and it was one of my favorites.


    I have been eying this adorable skirt for quite some time since I found it over at Make it & Love it. You take a square of fabric and cut a circle in the middle a little bigger than the waste it will be fitted to. You then attach the circle you just cut, to one of these adorable and colorful waste bands. And that's it!

    Sadly, I do not have said adorable waste bands so, I had to improvise a little to hide my ugly white elastic. 

    Also, I wanted a little more coverage so that maybe little Emory could wear this without leggings during the summer.

    The Skirt


    With all these things in mind I decided to do two squares. One square I turned 90 degrees on top of the other, so that I would end up with 8 points instead of 4.

    I also decided I would sandwich my elastic in between the two square layers. One advantage I found with this is that I could leave a tiny opening in between the two layers and cut the elastic a little longer than needed. I went ahead and stitched the elastic so that it will fit now, but when she grows and it needs letting out, I have very easy access to the elastic without cutting into anything.


    The Hair Bow


    Of course there is a hair bow. I mean what else are you supposed to do with the leftover fabric? It also gave me a chance to look through some of the fabric that my wonderful grandmother gave me. 

    There will definitely be pictures posted, of Emory in her new outfits and accessories, as soon as I can get my hands on that baby! (BABY, I can't keep saying that much longer, she is growing up so quick!) So check back soon!


    Sunday, July 21

    Hair Bow How-To

    Today I spent the day making hair bows for my boyfriends niece to match the cupcake dress I just made her, (my first attempt at pattern sewing and it went fairly well!) I think the hair bows turned out pretty cute so I decided to share how to make them with you! These little hair bows are very easy to make; I made several in one afternoon! Essentially all you need to know is how to make a whip stitch, running stitch, and a slip stitch. So, let's get started!

    Things You Need:

    • In this case, fabric ribbon is preferable.
    • Use any size, color, shape buttons you like. I got my cupcake buttons at Hobby Lobby.
    • Cut a circle out of a 5x5 square of fabric by folding it into quarters and cutting a rounded edge. Alternately, find something around the house to trace with approximately a 5" diameter.
    • Frixion markers are the absolute best for marking on fabric. Mark all over your fabric and then iron it away; like it was never there at all. Best investment I've ever made in a sewing tool.


    Prepping and Gathering the Ribbon:


    Step 1. Cut a long piece of thread, thread your needle and then double the thread so that the two ends meet. Tie a knot at the end.Take your 8 1/2" piece of ribbon and fold it in half, right sides together. Line up the raw edges, this is the point when you can carefully melt the edges of the ribbon with your lighter so they don't fray. Next, sew a whip stitch straight across, (top dotted line in picture above.) After you are done stitching, unfold the ribbon and gently tug to make sure that your stitches are secure. No need to cut your thread yet.


     Step 2. Now press your new seam over to one side and hold it down with your thumb. With your needle, carefully pick up one little thread of the backside of the ribbon and then go through the two joined edges. Repeat this until you get to the end. This makes a crisp, sturdy seam on the outside of the ribbon. Cut your thread. You should still have quite a bit of the thread, if so, tie another knot in the end. If not, cut a new piece, thread, and knot as in step 1.

     Step 3. Now, starting on one side of the seam, sew a running stitch along the outside edge of the ribbon to the other side of the seam. I marked my edge with a dotted line so you could see.

     Step 4. Gather the ribbon by pulling on the needle side of the string so that the ribbon bunches up. Be careful not to pull the beginning knot through the ribbon.  Spread the gathers so that they are more even and leave yourself a bit of hole that is about the size of a dime. Tie off the thread by sticking the needle through the edge of the ribbon and putting the needle through the loop before pulling it taut. I do this a couple times for good measure. Cut your thread and any little tails you have left behind.

    Making the Yo-yo:


      Step 5. Thread your needle as in step 1. After you have cut your circle out, hold your circle so that the wrong side of the fabric is facing you. Sew a running stitch all along the outer edge of the circle, (along the dotted line in the photo above.) Once you have gone all the way around, your circle should look similar to the picture above, right.

    Step 6. Pull the needle side of the thread tight, careful not to pull the beginning knot through the fabric. Your circle will look like a little drawstring coin purse. Next, flatten out the bottom so that it looks like the picture above. Secure the opening by passing your needle through from one side of folds to the other, making sure to catch some folds in the process, and then making a knot. I do this three or four times until I feel it is secure. No need to cut your thread.

    Putting it All Together:

     Step 7. Thread the ribbon ring onto the needle and thread so that it sits on top of the yo-yo you just made.


    Step 8. From the inside of the ribbon ring, slip or whip stitch all around the inner edge, connecting the ribbon with the folds on top of the yo-yo. Be careful not to go through all the way to the back of the yo-yo because it begins to look messy if you do. This doesn't need to be perfect because it will not be seen. Once you get all the way around you're all set to move on! No need to cut your thread unless you are running low.


    Step 9. Sew on your button. I try to sew the button mostly to the yo-yo folds in the center. I like to start underneath the button, catching a few folds, up through the first button hole, down through the second, catch a couple of folds and then out between the ribbon ring and yo-yo. It's not an exact science, do whatever makes you feel the most secure.

     Step 10.  That's it! Make sure you knot your tail as close to the fabric as possible between the two layers, cut all your tails, and you're done! You can sew or hot glue these to hair clips, headbands, clothes, bags etc...

    They really do turn out cute, I can't wait to see it in Emory's hair!

    I hope this has all made sense. Comment if you have any questions. Post pictures if you make your own! This is my first tutorial so constructive criticism is welcome. :)

    -Michelle


    Wednesday, April 6

    Oh Baby!


    Speaking of babies, making baby bibs is where its at! They are fun to design and fairly easy to put together. On previous bibs I have done I was just straight stitching right along the outer edge to finish it up but I have never been totally happy with the results. That being said I found a more suitable solution to this, going all along the perimeter with the zig-zag stitch, covering up the edge of the fabric makes for a very sturdy (maybe too sturdy,) finished look. I also used this technique on the strip for a more uniform look.


    I used 3 different fabrics for this project and the way I cut out the fabric gives me enough for 2 bibs (a set.) The second, on hold for the moment while I work on pillow covers, will have the pink fabric on top and the rose fabric on bottom, same stripes in the middle, but more on that later! This bib has a Velcro closure, any moms out there, is that preferable to snap closure?


    I also tried out a little applique on this bib and sealed it off with a blanket stitch. Not too shabby! Somehow the roses ended up perfectly placed, something I always forget to plan for :).

    Thinking about selling these $10 for 2? Any thoughts?

    Attempted the Whole "Quilting" Thing......

    After some news from my boyfriend's sister I decided that I should get on the quilting train and see about making a baby quilt. I'm quite happy with the results and was able to get it done in one day. First attempts aren't usually the best and there are some things I need to work on like getting the squares to line up just perfectly.

    Thanks again to Boone Walmart/Michaels for such a lovely fabric selection, not! Maybe I need to get into ordering fabric online. Thankfully babies are associated with bright colors and simple patterns because that's most of what they have. :/

    I decided to go with anchoring the quilt with little bows, still some work to be done there.
    I left a large section in the middle because I'm planning on learning to embroider at some point, or possibly applique there? Either way, there is some planning and research to do there.

    I would really love some tips and advice from anyone out there who is willing to share!

    Sew4Home "Strawberry Fields" pillow cover.

    I was surfing around on the internet last night looking for a good sewing blog to follow when I stumbled upon sew4home.com. It seems really well maintained, with a variety of project ideas, tutorials, and sewing resources. I found lots of projects to put on my to-do list but couldn't resist the Strawberry Fields pillow cover! The tutorial was great and easy to follow, it was actually a very easy pillow cover to make considering how complicated it looks!

    Here is the finished product:

    My pillow was about 17.5" x 17.5" I was saving this pretty green (looking yellow in every picture for some reason,) fabric that I got from Walmart for something to make for myself, and this seemed perfect :). Honestly I didn't pay attention to what the tutorial said about the back of the pillow, I was really just following it to get the front done, (2 brown front pieces 5" x 17.5" and one green piece 9" x 17.5")

    I went ahead and made the back of the pillow envelope style so that I could take it on and off for washing. I believe I had two back panels each 11" x 17.5" to ensure I would have a good amount of overlap, since my first ever envelope pillow cover barely met in the back and didn't look so great.

    The only thing I would really consider changing about this design is that the brown lattice strips are only attached at the very edges which can make it kind of awkward to be anything but gentile with the pillow. I think it would be super cute with some matching buttons at each intersection or something to that effect, to keep the strips flat and taut against the pillow, but of course there is no where around here that sells that sort of thing. I suppose its something I could add later when I come across what I need.

    I am planning on redoing the cover for the other pillow this evening in the same 2 fabrics but I might try a different look to contrast this one.